
What’s inside this article: Step-by-step instructions for how I completely transformed my bedroom closet doors for only $119. This article includes tips and tricks for getting the best refinish and more closet door makeover ideas to help inspire you to find your own personal style.
Disclaimer: This post contains affiliate links.


I purchased my first home in June. It’s the perfect house for me, except the previous owners were elderly, so everything is a tad outdated. I’ve decided to do all of the upgrades myself, and to be honest, DIY is not my “thing,” so this is new to me.
It’s a learning experience, and as I learn, I’m sharing it here so other people can bring their visions for their homes to life and hopefully save money doing so.
I wish I had better “before” photos, but when I began this process, I didn’t plan to share it on a blog, so we’re working with what we got.
If you’re here, you might have realized that bi-fold closet doors are expensive as $&*!, and now you’re hoping to do a closet door makeover on a budget.
DIY Closet Door Make Over
Luckily, you can make those outdated, 70’s style stained wood closet doors look beautiful and suit your personal style, whatever that may be, fairly easily and for a fraction of the cost of new closet doors.
I’ll share the products I used for my own closet door makeover here. You can change the knobs and paint colors to match your own decor. There are even some photos for inspiration at the bottom of this article if you’re feeling a little stuck.

You Will Need:
- “Diamond” glass knobs
- Rust-Oleum Specialty Blush Pink Chalked Paint
- Oil-based primer – it’s very important that you use an oil-based primer. This is the brand I use.
- Two angled paintbrushes
- Sanding sponges
- Clear finishing wax
- (Optional) Plastic drop cloth
Steps for Refinishing Closet Doors:
1. Remove doors from tracks and remove hardware
First, take your closet doors off. Next, remove the current hardware on your doors. This includes knobs or handles and any hinges. Lay your doors down flat.
2. Sand
Begin by sanding down the doors. This removes anything from the surface that may prevent the primer and paint from sticking properly.
You’ll have a better end result, and it’ll last longer by taking the time to do this step. You don’t need to go crazy and make sure everything is completely sanded down and even but spend 10-15 minutes going over the entire surface by hand. For this step, use the more coarse sanding sponge.
3. Wipe down with a damp cloth
Wipe everything down with a damp cloth to make sure all the dust from sanding is removed before you begin priming.
4. Prime
Begin applying a thin coat of primer to your closet doors, using the paintbrush, and stroke in one direction to create an even finish. Watch out for drips that may run down the sides of your doors.
Allow the primer to dry completely before you flip over to prime the other side.


5. Repeat on the other side
Once you’ve finished priming one side of the doors and allowed the primer to completely dry, flip it over and sand, wipe down, and prime the other side.
Tip: I recommend completing all the priming before moving on to painting rather than priming and painting one side at a time (which is what I did) because any minor drips will require touch-ups when you’re finished. But this is why I’m writing this post – to help you save time and have a great end result.
6. Paint
Now that the primer has dried fully, you can begin painting your closet doors. Work on one side at a time, the same way you did with the primer, allowing the paint to dry completely in between coats.
Apply the paint in thin coats using your paintbrush and even brush strokes in a single direction. You should plan to do 3 or 4 coats of paint for the best finish.


Important tip: in between coats of paint, use one of the finer grit sanding sponges to lightly scuff the paint and wipe clean with a damp cloth. This will help the additional layers of paint to coat and adhere to the surface building a more durable finish.
Any drips of paint that may run down the sides of the doors should be sanded smooth before applying the next coat of paint.
7. Apply Finishing Wax
After you’re completely finished painting your DIY closet doors, the next step is to apply the finishing wax. This helps seal the chaulked paint and prevent stains because it’s such a dry matte finish. The wax can easily be applied evenly using a brush or a cheesecloth.
I personally used a cloth to apply my wax and rubbed it into the doors using a circular motion.
You can reapply the wax to your doors whenever you want to give them a quick refresh; a little goes a long way.
8. Attach Your Hardware and Rehang Your Newly Made Over Closet Doors!
The hard part is over, now you can attach your new hardware and hang the doors back up. Take a step back and be proud of your hard work!


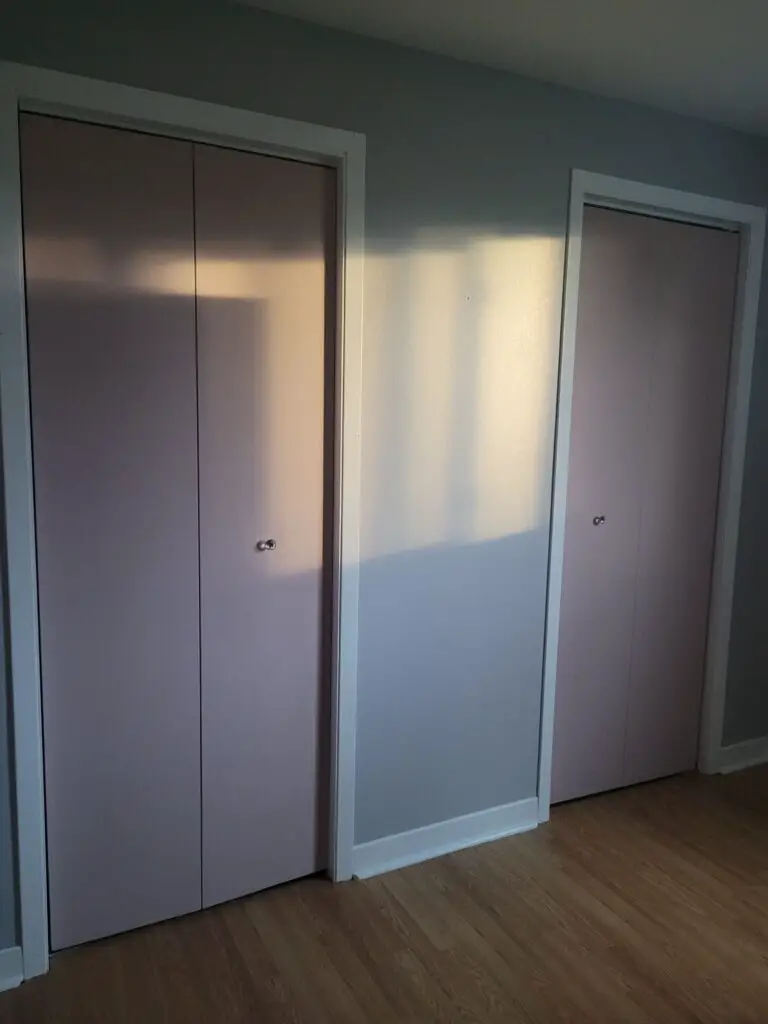
The Closer Door Makeover – Finished Product:
Here’s the end result. I also painted the baseboards while doing this project. I used the same primer and white trim paint and followed the same technique of gently sanding in between coats.


More DIY Closet Door Ideas
Looking for more inspo for your DIY closet door makeover? You can use any paint colors and knobs/hardware combinations you want to achieve your own unique look. The possibilities are endless.
Here are some other ideas I love that I found to help inspire you:
DIY Cane Closet Doors:
I love how these doors look. You can find instructions on Hackett House Studio here.


Add A Pattern to Your Painted Closet Doors
Don’t want one color? How about adding a painted pattern to your doors to make them pop? Get the how-to on Rain on a Tin Roof here.


Go from Flat to Paneled and Do It Yourself!
Here is a tutorial to turn your closet doors from flat to paneled following this closet door make over from Joyful Derivatives!


